Woven Palazzo Pants Oh My!
I made my first pair of woven pants yesterday. Yes, all in one day! While I haven't necessarily avoided making pants, woven pants are intimidating. When working with woven fabric, there's no stretch making fit even more important. Fitting pants can be difficult, add on the woven non-stretch aspect and it's a whole extra layer.
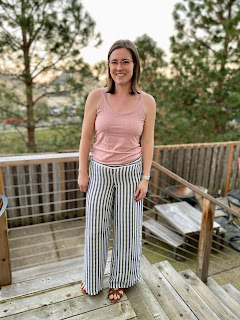
To give my first go at woven pants I decided to go with a relaxed palazzo style pant. The reason being, I didn't need to make adjustments for my thighs or calves which are usually multiple sizes larger than my hips and waist. My first introduction to woven pants was using the Love Notions Summer Caye pattern. I've been looking at this pattern for over a year but never had quite the right fabric on hand to give it a try. In the last year though I've added to my woven stash with a better understanding of woven fabric types that I like to wear and sew meaning I now have some on hand to sew with!
The pattern I've used is $5 today (2/11/2022) as the Featured Friday pattern. I'd recommend the pattern on sale or not. You can use the code 'KATIEK10' for an extra 10% off any Love Notions purchase at anytime including Featured Friday patterns.
Pattern Details
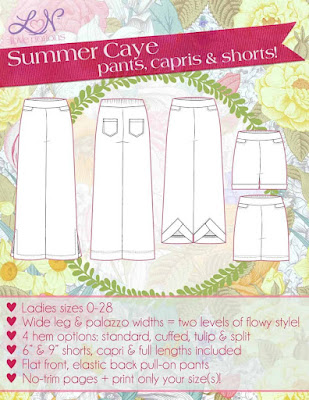
Let's talk about all the details in the Summer Caye pattern! It has quite a few options for a single pattern. It can be made in 3 lengths (short, capri or pant), 4 hem finishes and wide leg or palazzo style widths. This pattern does have a projector file which I was able to use for cutting. This was beyond helpful since these are wide leg pants, they take a lot of paper to print and assemble the pattern.
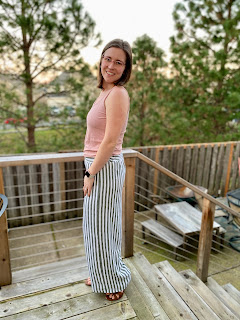
I chose Palazzo width, full length standard hem with no pockets.
Sizing & Fit
The size chart was a bit challenging for me to navigate. It provides waist, high hip and full hip measurement with you selecting your size based off your full hips. With knits you can often size down when between sizes. With woven though unless instructed differently, it's best to size up to ensure there's enough ease. Here's my measurements:
Waist: 30" (12)
High Hip: 35.75" (10)
Full Hip: 38.75" (8)
Based on my measurements at the full hip, I was to make a size 8 with elastic measurement of a size 12. After making the pants, I think I'd go with the size 10 next time as I have to shimmy a bit into them at the hips. If you have 2 or more size difference between your full hip and waist, I'd consider sizing up your full hip. You can always take it in. The size 12 elastic fit great.
I'd always recommend when working with wovens to make a muslin or test fit of a new pattern. The best way to do this is with a pattern like this is to cut the shorts length and check fit on the waist and hips where it's more fitted. I didn't do this though. It was a bit nerve racking but fortunately it worked out for me this time. When making your muslin, you can make the most basic version of the pattern.
Since this was my first go at woven pants, I opted to simplify the sewing process by omitting the front pockets. It's not that I thought they'd be tough, I wanted to save time and don't find I use front pockets in pants. Plus as you'll see, I'm working with stripes. My eye always wants stripes to match so I would have added an additional difficulty of stripe matching the pocket backs to the pocket leg fronts. I didn't need to add on that extra difficulty with this make.
Sewing
The sewing process was quick and easy. I used my sewing machine for straight stitching then finished seams with my serger. If you don't have a serger, using pinking shears works too. You could also add French seams if you want to have finished inside seams.
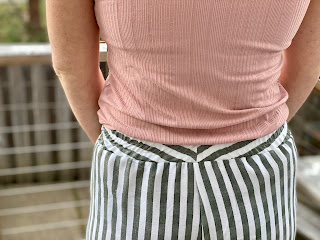
The waistband is finished with encased elastic just in the back. I like how this gives a flat front but ease for the pants to sit nicely. Make sure when creating your elastic channel, you are leaving enough space for your elastic. The tutorial instructs to stitch at 3/8" from the raw edges to create the elastic channel but if something has shifted in your waistband construction, that may not allow enough room for wide elastic. I used a sewing gauge to measure and add markings before stitching to allow room for the elastic.
Adjustments
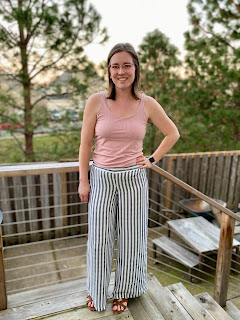
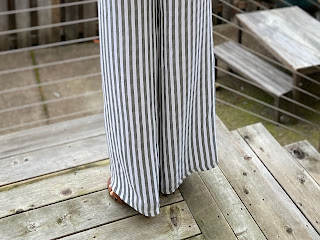
Other than the sizing adjustments mentioned above, the only other adjustment I made was to the length. I have shorter legs and prefer pants to not pool at my feet. The easiest way to decide on length is at the end. I sewed the Summer Caye's to the point of needing a hem, then tried them on. I was able to pin them to what I suspected was my desired length. Then I added a basting stitch to make sure that was the case. In the end, I removed 1.5" from the length so I could have them just at the floor.
This photos is wearing 2" wedge sandals with them off the ground. This is all preference based, hem length can be adjusted however you like.
Fabric
I'm not sure where I purchased this fabric or what it is for that point. I'd suspect this is a rayon blend. I'd recommend a woven with drape that isn't stiff at all for the Summer Caye's, especially the palazzo width. You want them to sway with you and not fall straight and flat.
Styling


My posts may feature affiliate links. This means if you make a purchase from these links, I receive a small percentage in compensation at no cost to you. I may have received patterns or products to test or review but the opinions I voice are my own.

Comments
Post a Comment