Pinspiration: Rolled Cuff Tee
Last night I was in the bath browsing Pinterest. This is what I do when I need to be inspired and am at a bit of slump in my sew-jo. I searched all kinds of things finally landing on the idea that I wanted to make a fun tee shirt for me. I've never been one to gravitate to a graphic tee so this idea was surprising. After just a few minutes, I found it. The perfect pinspiration for me! I quickly got out of the bath and made it happen. One thing I've found, is you can't mess with sew-jo. If you have it and an idea, make it happen pronto!

My Pinspiration is actually a shirt you can buy on Amazon for for $11 plus shipping. What drew me to it is the message and color. Quarantine feels like it's never ending so I wanted a cheery top to make me happy.
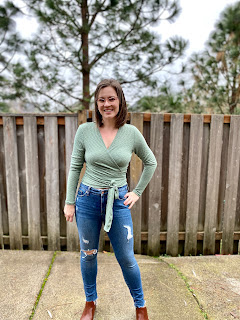
What do you think of how it turned out? I'm in love with it! I'm getting some drag lines because this is day 53 of Quarantine so I'm wearing a bralette and not a bra. If I was to wear a bra, the fit would be much different.


My Pinspiration is actually a shirt you can buy on Amazon for for $11 plus shipping. What drew me to it is the message and color. Quarantine feels like it's never ending so I wanted a cheery top to make me happy.
 |
| Source: Amazon.com |

Read below to see how I made this awesomely fun tee! I have info on the pattern, fabric and how to add a rolled cuff to any tee.
Next up, I loaded the projector file for the Classic Tee on my computer, turned on my projector and cut away. The Classic Tee has 3 neckline options. Although my inspiration is a crew neck, I know that those aren't really my thing so I cut the scoop neckline. I'm still very much enjoying the time saving of having the projector. If you are still on the fence you can read my previous blog post all about my projector setup. For fabric, I'm using a grey slub cupro from Mily Mae Fabrics. I picked this fabric because I like how the neutral grey made the colorful letters pop. The cupro ended up being wonderful to press vinyl onto too.

At this point, I'd recommend pausing and adding the vinyl before constructing your top. It's easier to line up and press the vinyl to the front bodice piece before it's assembled. I have a Silhouette Cameo and used Siser EasyWeed Heat Transfer Vinyl for this project. I designed the vinyl myself opting to change the words a bit. By removing a few words, it saved me on cutting time and htv. I'm not going to go into how to do this rainbow of vinyl here as I didn't do it the most efficiently in an effort to use up scraps. My process was slow and not super precise but got the job done.
Once your vinyl is pressed onto your front bodice, continue constructing your shirt according to the tutorial. Hem the bottom but don't hem the sleeve. Now we'll do the quick hack to add the rolled cuff to the sleeves.


To calculate the cuffs, measure the width of your sleeve.

Mine is 13" around. Then follow the formula below.
For these cuffs, here's what I calculated. 13" x .90 + 0.75" = 12.45"
Next, decide on the height of your cuff. I opted for a 1" cuff height. You will get a cuff that's a bit shorter due to the process of flipping the cuff up.


Pattern & Fabric
To start with, I had to pick a pattern for my base top. The Love Notions Classic Tee came to mind right away. I've had this pattern since it's release but since I don't reach for tees, hadn't given it a try yet. I liked that it's semi-fitted at the bust and loose at the waist and hips. I'm between sizing of a small and medium for this pattern. I was able to compare my measurements to the finished measurements size chart and choose to make a small. At first I wasn't planning on adding the rolled cuffs but since they are an easy fun detail, I gave it a go. It was totally worth the few extra minutes. Note: If you are reading this the first week of May, that means it's the 40% off site wide sale and the Classic Tee is only $5!Next up, I loaded the projector file for the Classic Tee on my computer, turned on my projector and cut away. The Classic Tee has 3 neckline options. Although my inspiration is a crew neck, I know that those aren't really my thing so I cut the scoop neckline. I'm still very much enjoying the time saving of having the projector. If you are still on the fence you can read my previous blog post all about my projector setup. For fabric, I'm using a grey slub cupro from Mily Mae Fabrics. I picked this fabric because I like how the neutral grey made the colorful letters pop. The cupro ended up being wonderful to press vinyl onto too.

Create Your Graphic
At this point, I'd recommend pausing and adding the vinyl before constructing your top. It's easier to line up and press the vinyl to the front bodice piece before it's assembled. I have a Silhouette Cameo and used Siser EasyWeed Heat Transfer Vinyl for this project. I designed the vinyl myself opting to change the words a bit. By removing a few words, it saved me on cutting time and htv. I'm not going to go into how to do this rainbow of vinyl here as I didn't do it the most efficiently in an effort to use up scraps. My process was slow and not super precise but got the job done.
Once your vinyl is pressed onto your front bodice, continue constructing your shirt according to the tutorial. Hem the bottom but don't hem the sleeve. Now we'll do the quick hack to add the rolled cuff to the sleeves.

Rolled Cuff Hack
First, we need to remove the hem allowance from the sleeve. We need to leave a seam allowance for adding the cuff so remove 5/8" from each sleeve length.
To calculate the cuffs, measure the width of your sleeve.

Mine is 13" around. Then follow the formula below.
Sleeve opening x 90% + seam allowance (3/8" doubled)
For these cuffs, here's what I calculated. 13" x .90 + 0.75" = 12.45"
Next, decide on the height of your cuff. I opted for a 1" cuff height. You will get a cuff that's a bit shorter due to the process of flipping the cuff up.
Ending cuff height x2 + seam allowance (3/8" doubled)
For these cuffs, I calculated 1" x2 + 0.75" for a cuff height of 2.75".
Go ahead and cut 2 cuffs. My cuffs were 12.45" wide x 2.75" high for the size small.

Fold each cuff matching the short sides right sides together. Clip or pin. Serge along the short seam.

Turn the cuffs with wrong sides together. Clip at the seam and half way point. Add a clip to the half way point of the sleeve as well.

STOP: Make sure you follow this next step correctly. Place your cuff inside the wrong side of your sleeve, matching the clips together, lining up the cuff seam with the sleeve seam in the armpit. Serge or sew in place using 3/8" seam allowance.
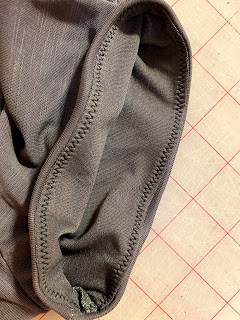
With the shirt right side out, flip the cuff out and iron the seam towards the bodice. It is very important not to skip ironing here or you won't have a crisp seam.

Understitch the seam using a zig zag or long straight stitch. You will be sewing the serge to the front bodice NOT the cuff. I tried using both a zig zag (below left) and long straight stitch (below right) for this step. I found the long straight stitch lays better and has plenty of stretch still. I'd recommend that one. Tip: I use an edge stitching foot for this step and move my needle over a bit.


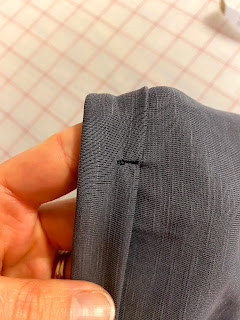
Flip the cuff to the right side covering the serge and under stitching stitches. Press again. I prefer to add a tack to keep the rolled cuff up. I add one to the seam in the armscye and another at the top of the sleeve. Now your cuffs are done!

I honestly think mine came out better than what I would have ordered online. I love that I got to use a fabric I love and make my own take on a basic cotton tee. Mine is anything but basic especially paired with my hot pink acid wash jeans. 😝


My posts may feature affiliate links. This means if you make a purchase from these links, I receive a small percentage in compensation at no cost to you. I may have received patterns or products to test or review but the opinions I voice are my own.

Comments
Post a Comment