Creating a Geo Tank

If I can't find the pattern for the item I'm envisioning, I hack it! I took it even further this time though as I used a menswear tank pattern to make my vision. Here's how I used the Sinclair Rocky Tank into a hacked geo front dropped armsyce tank.
Let's talk about why a men's tank pattern. I've been on the hunt for a low armsyce tank to wear over sports bras. The look I've been going for I just haven't found a women's top like I envision. Then Sonia at Mamas Craftroom posted using the Rocky tank for herself. It was just what I wanted. The Rocky Tank has a standard or low armysce as well as a neckband or hood. There are side colorblocking panels included but I'm doing my own thing instead. I'm using the low armsyce and neckband for this top.

Before you proceed, check the size chart and make sure you fit into it. I wear a size 6 regular in Sinclair Women's patterns. For the Rocky, my measurements put me into the smallest size, US34 for my bust/waist with grading needing to a US36 for hips. For height, I'm 5'5" so used the short height files. The men's patterns are drafted for longer lengths so make sure to check where you want your final length. I opted to cut at the "leave out" or shorter length.
Fabric
This whole idea started with a strike-off I received from Sew Dynamic Fabrics. The specific fabric is the Climate Stripes which are on an athletic base. Each stripe represents the global temperature from 1850-2018. What else is cool about this fabric company is that it's all made from recycled plastic bottles! Each yard of the athletic fabric is made from 16.2 plastic bottles, is moisture wicking and has UPF 30+.

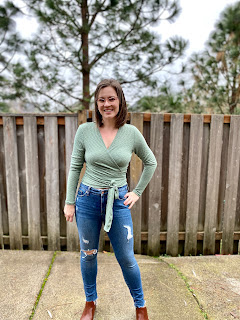
I had a very clear vision of how I wanted this tank to look finished and with that, what I wanted the whole look to be. I purchased cobalt supplex from Mily Mae Fabrics that coordinates beautifully to make this a full set. I sewed up leggings and a sports bra for under the tank.
For the leggings, I picked the Patterns for Pirates Peg Legs. These are my most sewn and most worn leggings pattern ever. What I like about the peg legs is that they fit with an array of fabrics, including this thick supplex athletic. This pair I chose the capri length paired with the contour waistband. The contour waistband can be found in the add-on pack while the plain peg legs are a separate listing. Both are free patterns. For fit, I'd highly recommend grading if your measurements fall in different sizes. I graded from a Large waist to Medium hip to XXL calves here.

For the sports bra, I made another Classic Sports Bra, also from Patterns from Pirates. I tested this pattern a few months ago and was really happy with the fit. The pattern offers a straight or racerback, I made the racerback. I usually find racerback bras uncomfortable on my neck but this one I can wear all day without any issues. I measured into a size medium exactly which is what I make. With this classic sports bra, I used the same cobalt supplex for the main and lining. I did modify the under bust band to fit 1" elastic as that's what I had on hand.


Geo Hack
For this hack, I'm using the low armsyce cutline. After you have your pattern printed and graded, it's time to lay out the geo cut lines. The Rocky front piece is cut on the fold. We will need the full front piece so trace that mirrored so the piece you are working with is no longer on the fold. Take your ruler and lay it across the front piece at an angle. I think it's easiest to start with the largest main piece. I'd recommend using a pencil to create this line so you can adjust it if needed.

You can design your geo however you'd like. I chose to have 3 panel cuts on mine but you can add more if you'd like. Draw your next line perpendicular to the first line. I'm using stripes so I had to make sure it was at a 90 degree angle to the first line.


Now the most important part... ADD A SEAM ALLOWANCE to any line you just added! You can choose to draw a seam allowance on your pattern piece or add it while you cut. I chose to add 1/4" (which is the seam allowance of the Rocky) as I cut the fabric out. Optionally, you can also create 3 new pattern pieces and add the seam allowances. I find that a bit more work.
Cutting
My method for cutting is to simply fold the pattern piece because I like to keep my pattern piece intact. If you want to cut your pieces apart, then do that but remember to add your seam allowance. I cut the piece I labeled 1 first. It's the largest and bottom piece along the hem. I folded the pattern piece along the first line I drew. Then I added my clear ruler with 1/4" over the edge to add my seam allowance.
An up close of how it looks to add 1/4" seam allowance with the ruler.

Next cut piece 2. This piece will have 2 edges you will need to add the seam allowance to; the edge to the bottom and left.

Finally, cut piece 3. Make sure to add the seam allowance like before on the 2 edges.

Just to double check, lay out your pieces right side up to make sure all of the pieces are cut correctly. Cut the back piece, neckband (or hood) and arm bands, if you are using those.

Construction
We will assemble the front pieces the opposite way we cut them out. I find it easiest to lay out my pieces right side up how they should look to make sure I sew them together correctly. Match right sides together of Piece 3 and Piece 2 along their shared edge. Sew or serge with 1/4" seam allowance. Press the seam. Optionally, topstitch.
Match right sides together of Piece 1 with the edge of Piece 2/3. Optionally, topstitch.

I used 2 needles in my coverstitch for topstitching. Make sure to press after topstitching to remove any rippling.

Your front piece is now ready to use as it would normally be. Continue construction according to the tutorial.


Final Assessment
I'm really happy with this tank overall. I'd do the geo design the exact same next time. I do think when I make the Rocky again, I'd size up, especially at the hips. This is nothing against the pattern, just that it's drafted for men and my body shape is different than that. I'd like a bit more ease there.


Comments
Post a Comment