MakeNine2020: Pants!

What I learned about myself from 2019 was that I do a much better job at achieving my goals if a pattern test is involved. For 2020, I was invited to be a Love Notions Ambassador which basically means helping sew and share their pattern brand. It gives me a chance to try out their existing patterns, hack them and be in touch with a group of likeminded sewists. It also gives me the opportunity to be apart of things like updating their popular Sabrina Slims pattern.
About the Pattern
The Sabrina Slims are a cigarette style fitted pant. With the update, they range in size from 0-32 now. Here's some of the options with these pants.- Designed for woven or knits with a minimum of 20% stretch
- 2 views: plain leg or center leg seams
- Hight Elastic Waistband
- Front pockets (optional)
- Back Pockets: Welt or Patch
- Hem: Standard, split hem or zipper
- 3 Hem lengths: 26", 28", 30"
- File types: Projector, A0, A4, US
- Fitting Workbook included (for fit help with common fit adjustments)
Learnings & Tips
With making my first pair of pants, I quickly learned that when people talk about making a muslin they are serious. Making a muslin can provide so much information about what type of adjustments you should make for an optimal fit. Keep in mind though that you need to use a fabric for the muslin that fits into the pattern requirements. My muslin pair was made from plaid jacquard double knit and contained about 40% 2-way stretch.
For my muslin and each version I made, I basted the seams. I find that's the easiest way to adjust for fit. To baste, I turned the straight stitch to the longest length on my machine (which was a 5 length). I also switched out my thread color to be vibrant so it was easier to remove the stitches later.
After I made changes for my fit, I would serge along the basting stitches. Then I removed the basting stitches. By basting in the first place, this allowed me to add back width in for my calves once I tried them on.
Also, remember that the fit changes when you add the waistband. Some of the lines that you get may go away when that's added and holding the pants up.
My Makes
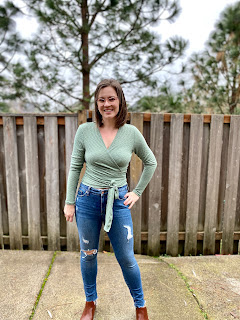
First, I made these Sabrina Slims in double knit. This double knit came from Mily Mae Fabrics and was one I scored from their year-end clearance. Here's some other double knit they have in stock. These were a more plain version since I wanted to get the fit figured out for my body. What's extremely helpful is that the pattern now comes with a common fit adjustment guide. It shows diagrams that if you have lines or folds in certain places and directions, what type of alterations you should make.

Based on my measurements, these are graded from 10 waist to 6 hip to 10 thighs to 16 calf. I did find that I didn't need to quite go out to the size 16 calf and ended up taking that in ever so slightly. I'm 5'5" tall and measured to have an inseam to my ankle of 27.75". I cut at the 28" inseam length and ended up taking a bit larger of hem allowance to get them to end at my preferred length.

For personal preference, I removed 1.5" to the front rise of these pants. I love the high rise in the back but wanted it below my naval on the front. For the elastic, I followed the pattern recommendation to measure just below your naval and then subract 2" for the elastic. My measurement was 34.5" so I cut the 2" wide elastic 32.5" long. Then I overlapped it 1/2" once it was in my waistband. I find it snug but not tight. I know 2" elastic can be expensive and difficult to source so I've linked the Amazon listing I used which was great quality and quick shipping.

What I love about this pair is how they can feel fancy with heels or I can put on flats and dress them down. If I was working in an office, I wouldn't second guess wearing these.
A key learning from sewing with this plaid is sewing with stripes, plaid or directional fabric might not be the easiest decision for your first pair of pants. It took much longer for me to try and line up the side seams than if I was cutting a solid fabric.

My second pair I was on a mission for. I've been on the hunt for new jeans for the last couple months and decided now was the time to give it a try sewing them myself. I went through my stash and ended up deciding on using a deluxe jeggings fabric for this pair. If you aren't familiar with jeggings, they are not quite as thick as denim but have the same look of them and tons of stretch. This fabric is also from Mily Mae Fabrics and was one I received in a scrap box. It's unfortunately sold out now. I would consider it a medium-heavy weight with a minimum of 75% 4 way stretch.

This version I felt more comfortable about making pants and wanted all the options. I chose to add front pockets and patch pockets. I also planned on the split hem option but forgot to cut them that way. Since this was a scrap piece of fabric, I very carefully laid out my pieces. I wasn't able to fit the waistband on the fold so ended using the waistband piece that puts seams on either side. I started this pair with adding my custom fit adjustment of lowering the front rise by 1.5". My grading for this pair was a 10 waist to 6 hip to 10 thigh to 12 calf. I ended up not grading the calves out enough and for the final fit, let the calf area out.
My biggest worry or challenge was the back patch pockets. Those fit differently on each person so although there was a guide on pocket placement, I ended up moving mine. The key here was that I basted them in place to make them easier to move. My patch pockets ended up moving 1/2" toward the back center seam based on my body shape.
For the pockets, I went slow on my topstitching. There was no need to rush and remove stitches. Instead I wanted them to be beautiful by taking my time. I also pulled out my trusty edge stitching foot for my Bernina to get consistently spaced stitches. For the double row look, I actually sewed 2 lines of stitches at a stitch length of 3. It may have taken a while but honestly, I feel like this pockets are perfection.

Since I was short on the jegging fabric and I wanted a fun touch to these pants, I opted to use a geo pineapple cotton lycra for the front pocket and waistband linings. I made sure to under stitch where recommended to ensure my pocket lining was hidden.


These jean style Sabrina Slims are my favorite. I can't wait to wear them for years to come and make even more. I see these being worn so much in my day-to-day. For these photos, I'm wearing them with a LDT tank and Toms. The LDT is a free pattern offered from Love Notions also.


UPDATE: I decided I needed to make another pair to try out View B and welt pockets. With View B, it takes a bit extra time for construction since you are cutting 2 pieces to create the front and back leg seams. The fabric I used on this pair is the Grey Leopard Double Knit from Mily Mae Fabrics BUT I took a risk and actually used the reverse side.
I opted to serge my pieces together and then topstitch with my coverstitch. Make sure if you are topstitching, you have plenty of stretch so you don't pop stitches. I also chose to topstitch the crotch seams to reinforce those.

I've never worn pants that have seams down the front and back of the legs. I wasn't sure what I'd think about it but in the end it's a really cool look. The topstitching allows the seams to lay flat which I really liked. Then I moved onto adding welt pockets. I love pockets and find them 100% necessary to hold my keys and phone with having young kids. I haven't sewn welt pockets in almost a year but the instructions were easy to follow and produced beautiful pockets.


Once I had the welt pockets installed, I followed the same steps I'd done with my previous pairs. I chose to again test the fit with basting stitches. This pair though I didn't need any adjustments and was able to serge the seams right away. I have to say, the fit is superb once again.

For sizing on this pair, I cut a 10 waist to 6 hip to 10 thigh to 14 calf to 10 ankle. I also chose to cut the waistband using the side pieces since I was short on fabric. As with the other pairs, I reduced the front rise by 1.5" per my preference. Also, this whole pair was cut using the projector file that's now included with the pattern. It made cutting so much quicker!


Pattern Assessment
Well I can say, I really love this pattern and the pants I have produced from it. I find them fitted in all the right places but with enough ease to be comfortable. I enjoy that depending on the fabric, they can have so many different looks. I can make my own stretch jeans with a stretch denim or jegging fabric or dress pants with a Ponte, stretch twill or double knit. Plus, the pockets weren't nearly as intimidating as I made them in my head.
I'm finishing up this blog post and then cutting out another pair today. I love them that much!
For people that have the first version of the Sabrina Slims, the newly updated patterns are available in your account to re-download. The fit assessment guide is a separate file. This pattern has been completely redrafted. If you are wanting to purchase the pattern, it's on sale through Sunday February 9, 2020.
MakeNine2020
There's nothing quite like checking off my first MakeNine2020 in February. I thought this would be one of the hardest items on my goals this year and it's done!
I'm proud of myself for overcoming the hurdle of making non-legging pants early in the year. I think this has set me up to be able to make the Dauphine jean pattern with less hesitation. I know more about my body fit and adjustments needed. I'm also happy I can wear my new Sabrina Slims now since other pants don't fit nearly as well.
Happy Sewing!
~Katie
My posts may feature affiliate links. This means if you make a purchase from these links, I receive a small percentage in compensation at no cost to you. I may have received patterns or products to test or review but the opinions I voice are my own.

Comments
Post a Comment