Lily Hack Series: Gathered Ruffle
Lily Hack Series: Gathered Ruffle
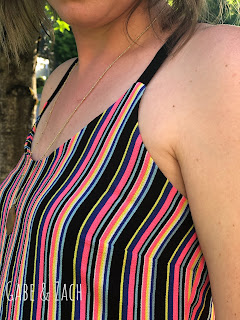
I'm excited to be featuring a series of hacks for the Sinclair Lily Camisole! Through this series I'll provide details on how to use the Lily as a base to turn it into different looks. The first look has a fun gathered ruffle at the bottom!
As part of this hack series, use coupon code Lily4 to purchase the pattern for $5.99. The Sinclair Lily is a pattern that was released in 2017. Patterns released recently from Sinclair Patterns have had an updated format that the Lily does not have at this time. What that means is that the Lily doesn't have the nested sizes where you can "select" which sizes you need to print or the cup sizes like the recently released Daisy. That being said, the two sizes smaller and larger are faintly printed on the size you print. I printed the size 6 based on my bust size which means the size 2, 4, 8 and 10 printed faintly automatically to allow to grade.
Pattern Hack Prep
To start, print your Lily pattern according to your measurements. This pattern includes pieces and directions for both a Full Bust Adjustment (FBA) and Small Bust Adjustment (SBA). Since it is made with woven fabric that doesn't contain stretch you want to make any necessary adjustments to get the optimal fit. In this case, I have a full bust of 37" which is between a 6 and 8. It is recommended to size down when between so I went with a size 6. Also note that the pattern recommends to not grade out for waist and hips unless you are more than 2 sizes different than your measured bust size. I measured a size 10 for waist and hips but cut a straight size 6.
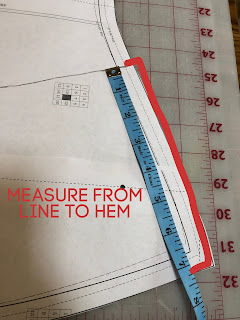
Here's what the back bodice piece looked like with the new line in purple. I also drew a line 5/8" above to show without the seam allowance. I was planning on a different way to do the hack and decided this was easiest. The purple line will be the cut line.
Ruffle Pieces
To find the ruffle height: take the amount you marked up from the bottom of the hem and add the seam allowance.
7.5" + 5/8" = 8 1/8"
I chose to round this to 8" to make it a bit easier.
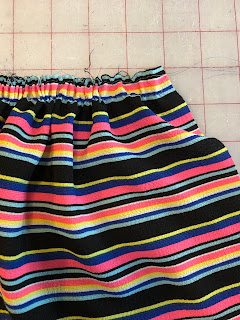
To determine the width of the ruffle, I measured along my purple line on the front piece and doubled it (for the other side on the fold). I found this was roughly 18". Depending on how volumeous of a gather you want, you'll want to add a minimum of half that amount for the gathers. I chose to cut each ruffle 36" wide x 8" high. Then cut 2 ruffle pieces so there's one for the front and one for the back.
There are two options for the back on the Lily. The classic is a wider scoop back that can be worn with normal bra straps. The fashion back is closer to a racerback style which is a bit higher and requires a strapless bra or bralette. I chose to use the fashion back since it was closer to my inspiration and added more drama to the back profile. This hack works with either back choice.
Cutting
The fabric I used for this ruffle hack is a rayon bubble crepe from Mily Mae Fabrics. It has some texture but presses and sews nicely. It is a vertical stripe with a black base and narrow neon stripes. As with any fabric, make sure to use pattern weights when cutting it out so it doesn't slide around. For cutting, I chose to cut two of the front and back upper bodice pieces on the fold rather than do a facing. You will cut only the upper portion down to the purple line on both pieces, on the fold.
2 straps
2 front bodice pieces
2 back bodice pieces
2 ruffles
Now that your pieces are cut, mark your darts and sew those. You will need to mark and sew the darts for both the main and lining front pieces. Press darts.
Construction
You will now follow the steps to assemble the bodice as outlined in the Lily tutorial. When you get to the steps for hemming, continue here instead.Take the short ends of each ruffle piece right side together and stitch at a 5/8" seam allowance. Finish this seam. On each ruffle piece, run a lines of basting stitches starting just past the side seams you just created at 1/4" and 5/8" making sure to keep long tails. I prefer to not run the stitches in the round but rather start and stop them at each side so there are two sets of basting stitches.
Take your bodice and place a clip at center back and center front. This will help ensure the gathering stitches are even when attaching the ruffle.
At this point line up and clip the side seams together. Then match up the center front clips for the front ruffle and front bodice and joined them. Do the same for the back. Then gently adjust the ruffles to evenly match the length of the bodice. Clip all 3 layers together every 2-3 inches. Attach using a straight stitch (length 2-2.5) on your sewing machine. Finish the edge. I used my serger for this step. Remove your basting stitches.
The last step will be to hem the ruffle. You can follow any hemming technique you prefer. I find it easiest to serge the raw edge first, double fold then topstitch. If your fabric is more slippery you may find a hem tape useful in this process.
Now you are done! Congratulations on making a beautiful ruffle cami. Remember to use the code Lily4 at checkout to get the Lily pattern at a discounted price of $5.99.
Fabric
For fabrics with the gathered camisole, I'd recommend something with a flowy drape but enough structure to support the ruffle. This pattern is designed for woven fabrics only. One benefit to fully lining the bodice is it provides extra structure for the ruffle to attach too. The fabric I used is the Margot rayon bubble crepe with a rayon challis for the straps, both from Mily Mae Fabrics. This is a vertical stripe fabric that I turned horizontally for the ruffle for contrast.Mily Mae Fabrics is also hosting a fun Twinning challenge this month featuring this fabric. If you purchase and sew up this fabric, post in the Mily Mae Fabrics Facebook Group a photo of your item to be entered for one of three $20 giftcards. Use the hashtag #MMFTwins with each entry.
My posts may feature affiliate links. This means if you make a purchase from these links, I receive a small percentage in compensation at no cost to you. I may have received patterns or products to test or review but the opinions I voice are my own.


Comments
Post a Comment