Mock Turtleneck Tutorial
It's crazy how trends from my childhood are back again. Velvet, scrunchies and mock turtlenecks are all one's that I've jumped on trend with lately. I received this amazingly soft striped rib knit from Mily Mae Fabrics and knew immediately I needed a mock turtleneck from it. So today I'll show you just how I made it!
With any pattern hack, I start with a base pattern. In this case, I chose the Made for Mermaids Women's Tai. The reason I went with this pattern is that I like the fit of the bodice and it had inset long sleeves which I was looking for. You can choose any top pattern you'd like, just make sure it has the fit you want.
One thing to note with the Women's Tai is the neckline options. For the front, there is the standard scoop neckline where the back offers a scoop or high back. I choose to use the high back cutline to cut out my back piece.
 |
| For the back, cut along the High Back Cutline and the sleeve armsyce |
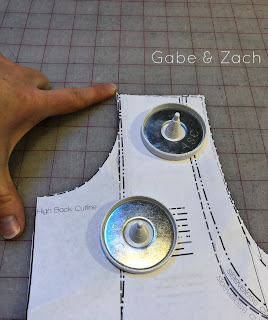
For the front piece, I decided to use the same "high back cutline" as my new front neckline. To do this, I laid the back piece over the front piece matching up the shoulder seams (where my pointer finger is) and the fold line on both the front and back pieces. You could go ahead and trace a new pattern piece for this but I found it to match very well and just went with it. Cut out your front piece following the new neckline which is on top. The front and back pieces now look very similar so I choose to add a clip to my front piece so I remembered which is which.
 |
| For the front, cut along the High Back Cutline once the back piece is laid over the front piece |
If you don't have the Women's Tai or would like a higher neckline, another option would be to use a crew neckline from any other pattern. You would cut the pieces normally and only make changes to the neckband height.
Now assemble your garment like normal, leaving the neckband for last.
For the neckband, start by measuring the neck opening of your garment. Use the following formula to calculate your new neckband length. *If you used a crew neckline, simply use the provided length in the pattern*
Neckline length x 90% = New Length + Seam Allowance
For example, if my neckline measured 24" and my seam allowance for the Women's Tai is 1/2" the calculation would be:
24" x 90% = 21.6" + 0.5" for a total length of 22.6"
For the mock turtleneck, I chose to cut the neckband a height of 5.25". So my neckband would be cut at 5.25" x 22.6".
Once you have the neckband cut, assemble your preferred way. Finish the hem or banding steps as stated in your pattern instructions. Your garment is now ready to wear!
I hope you found the steps easy to follow. If you have any questions, please feel free to leave a comment.
My posts may feature affiliate links. This means if you make a purchase from these links, I receive a small percentage in compensation at no cost to you. I may have received patterns or products to test or review but the opinions I voice are my own.


Comments
Post a Comment